Play Dough Recipe - Chocolate (Yum!!)

When I was looking around for some edible play dough recipe ideas I found several different types of chocolate play dough. What child can resist chocolate? Not me! Err... I mean, not my kids :-O

Chocolate Play Dough Recipe #1

This recipe requires cooking so the kids should not do this on their own. It can also be a little bit trickier to work with than traditional doughs because it has a stiffer consistency.

8oz semi sweet chocolate
1/4 to 1/3 cup light corn syrup

Take a pan of water and heat until gently simmering. Set a metal bowl over the pan and use that to gently melt the chocolate. Stir until smooth and then stir in the syrup. The chocolate will begin to harden very quickly but do make sure that to mix until thoroughly combined.

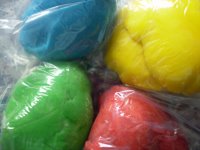
Once mixed, transfer the mixture to a plastic bag and refrigerate until cool. The consistency should be that of regular play dough but it could be a little too stiff if not enough syrup was added. You'll need to experiment with this and the results will also depend on the chocolate used.

Once the dough is firm it can be worked by kneading it but you may need to break it into smaller pieces at first to be able to work it effectively. This can be quite a sticky dough so if it sticks to your surface when kneading or rolling you can spray it with a little light vegetable spray.

This chocolate play dough recipe is great when used as decoration for regular dough. I highly recommend the book Creative Playdough Ideas for kids which has loads of idea for play dough creations.

Chocolate Play Dough Recipe #2


play dough recipe - peanut butter16oz vanilla frosting
1/4 cup cocoa powder
1 1/2 cups confectioner's sugar

Tip the vanilla frosting into a bowl and stir it up until smooth. Mix in the cocoa powder and then the sugar. This is another stiff mixture but it needs to be stiff otherwise it's difficult to work with it without it sticking to your hands.

Chocolate Play Dough Recipe #3

This is weird. Its a play dough recipe that has cocoa in it but it also has lots of salt just like the traditional play dough recipe. So... although technically it's edible, it's going to taste pretty bad! Still I found it on You Tube and I just had to include it because it was cute :-)

2 cups water
1/2 cup salt
3 cups flour
1/3 cup cocoa
2 tablespoons cream of tartar
2 tablespoons vegetable oil

Mix the salt and water together. Add the oil and boil the mixture. Now for the dry ingredients... Mix in a bowl the flour, cocoa powder and cream of tartar. Add the boiled ingredients into the dry ingredients and mix thoroughly. Now knead into dough and use. Here's the original YouTube video:

Get Creative with your Play Dough Recipe

So, you've got your play dough recipe and you're ready to get creative! What next? For a little inspiration check out some of these images that I found:

This first image comes from a book called Creative Play Dough Ideas for Kids. This is a 32 page downloadable e-book with instructions on your to make cute things with play dough.


These next three images I found on flickr. There are some very talented people out there. I also found some rather 'adult' looking play dough pictures on flickr so be careful what you go searching for on there!


Play Dough + Toddler = Disaster?

One of the benefits of using a good home made play dough recipe is that it doesn't matter if kids put it in their mouth, which is what the younger ones are almost certainly going to do.

I found this cute clip on YouTube of a toddler playing with play doh (the shop bought stuff), trying to eat it whilst poor dad is standing by trying to stop her (and not doing a very good job of it I might add!)


There's a couple of ways to approach this which depends on your child's age and how you are using the play dough. If your child is very young and you are introducing them to play dough to allow them to get used to the texture, colours etc then they are not likely to make anything particularly creative with it so you might want to just let them explore on their own.

By using the traditional play dough recipe which is very salty, if the child does put it in their mouth they are likely to spit it straight back out again. This can teach them that play dough is not something to be eaten.

On the other hand, take somebody like my son. He's two and a half, he still puts things in his mouth when we're not looking but he's old enough to know what food is. For him I would probably be more inclined to try one of the edible play dough recipe ideas because then I can tell him that its ok to eat it and that can be part of the fun for him.

As he gets to an age where he might be able to actually make something out of the play dough rather than just throwing it around the room, I would start using the traditional recipe, and try to explain to him the difference between the edible and non-edible versions.

With older children, the real fun comes when you can start to make really interestings things out of the play dough such as animals, faces and so on. If you want some ideas to inspire your kids then have a look at this little e-book: Creative Playdough Ideas for Kids.

Play Dough Recipe - Edible Varieties!

Many younger kids are at that age where everything they touch goes into their mouths. Even my toddler who is now two and a half still eats his toys (and his clothes... and our cushions...!) I was really hoping he would have grown out of that by now! Anyway, although most of the recipes we've looked at so far are not harmful to children, they're not really suitable for eating either.

These recipes are designed for eating! Make the dough, play with it and then eat the results. What could be more fun than that?

Peanut Butter Play Dough Recipe


play dough recipe - peanut butterFirst of all a word of warning with this one - some children have an allergy to peanuts. If you are in any doubt whatsoever, please do not use this recipe!

18oz creamy peanut butter
6 tablespoons of honey
3/4 cup non fat dry milk powder

Simply mix all of the ingredients together in a bowl with your hands. If your kids are doing this be warned that it can be a sticky, messy mixture so protect their clothing and your carpet first!

Once the mixture is well mixed you can use it like regular play dough. Try making a face and decorating it with raisins and slices of apple.

Here's another simple idea for a peanut butter play dough recipe - take chunks of the dough and roll it into balls, then roll those balls in a dessicated coconut, and then press chocolate chips into them. Not the healthiest of snacks perhaps but great fun!

Cream Cheese Play Dough Recipe

8oz cream cheese
1/2 cup non fat dry milk powder
1 tablespoon honey

Mix all the ingredients together until you get a consistency that can be molded. Use wax paper to make some shapes on. These are great for putting onto crackers afterwards and can make quite a healthy snack for the kids especially if you decorate with raw veggies such as celery and carrots, some nuts, raisins etc.

One word of warning with the cream cheese - this is perishable so this cannot keep for long. Observe the use by date on the cheese and be sure to eat before then.

Additional Tips

All of these edible play dough recipes must be stored in an air-tight container and refrigerated when not in use. They do not keep for long, especially the cream cheese one so please be extra-cautious with these recipes.

I also have a page dedicated to chocolate play dough recipes and I'd also recommend the book Creative Playdough Ideas for Kids which has some pretty cool ideas for things to make with play dough.

Play Dough Recipe - No Cook Play Dough

When you want to get your kids involved in the whole process, not just the playing with the dough, the no cook version is best as it's safe and easy to experiment. Even fairly young children can have a go at this one.

However, unlike a traditional play dough recipe, the no cook variety will not keep for very long, perhaps a week and it needs to be kept refrigerated. When dry, larger objects tend to crack with this recipe so it is best suited for making small ornaments, decorations, that sort of thing.

Ingredients

1 cup flour
1/2 cup water
1/2 cup salt
Food colouring

This recipe will only make a small amount, but of course you can increase it if you want to make more but as it doesn't keep for too long it's best made in small batches anyway.

Instructions

Combine the flour and salt in a bowl, pour in the hot water and any colouring you are using and then mix it up. If your kids are making this dough then encourage them to get their hands dirty and have some fun with it! Mix it all together and start kneading the mixture around until it forms a pliable dough and then knead it and roll it around in your hands.

Another great thing about this particular play dough recipe is that it is ready to use as soon as it is made, there is no cooling time needed. If your kids are running out of inspiration try Creative Playdough Ideas for Kids - 32 pages of colourful things to make with play dough.

When the Play Dough Recipe Goes Bad!

Using a home made play dough recipe has many advantages:

  • It's far cheaper than the shop-bought stuff
  • You can be sure that it is safe for toddler mouths!
  • Your kids can help make it which is more fun for them
  • You have complete control over the colours
But of course there is also that Dark Side! (cue evil Star Wars music...) Your kids can get in quite a mess:


The dough can turn into goop:

play dough recipe gone badIt can also go moldy but I couldn't find a picture of that, which is probably just as well!

In all seriousness, here's a few tips to make sure your play dough recipe comes out well, and you keep your kids and your environment safe:


1) If there is any cooking required in the recipe, do this yourself or very closely supervise an older child.

2) Before kneading your dough you might want to cover your working surface with something like wax paper. This helps prevent the dough from sticking and can prevent whatever it is covering.

3) Don't let the dough dry out (unless you are making dried ornaments of course). Keep whatever is not being used in an air-tight container. See the individual recipe pages to check whether or not that particular dough needs to be refrigerated.

4) Unless you have a special area that is designed for messy play, cover the work area with a plastic mat. Play dough and carpets o not mix! It is very difficult to get out! If it does get stuck in the carpet allow it to dry thoroughly and then pick it off with a knife.

5) Salty recipes can dry out soft skin. If you're using one of the recipes that contains a lot of salt make sure your children wash their hands afterwards and you might want to rub in a little baby lotion to keep them soft.

Fancy making that cute lady bug in the right sidebar? It comes from the book Creative Playdough Ideas for kids and this is just one of many creations featured in this step-by-step guide.

Play Dough Recipe - Traditional

play dough recipe - traditional
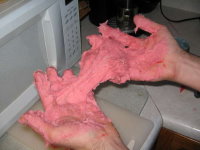
This is the most basic play dough recipe for a traditional play dough. It can last up to two months when kept in an air-tight container and it doesn't need refrigeration which is useful.

Once you've made a batch of play dough why not let loose your creativity with Creative Playdough Ideas for Kids.


Recipe Ingredients

1 cup flour
1/2 cup salt
1 cup warm water
2 teaspoons of cream of tartar
1 tablespoon cooking oil
Food colouring

Instructions

Mix all of the ingredients in a saucepan and cook it over a medium heat for a few minutes whilst stirring all the time. It takes a few minutes for the mixture to change from goop into proper dough so at this stage it can be tempting to add more flour but resist the temptation and give it another minute or so.

Once the dough is formed allow it to cool for a few minutes before kneading it into a smooth consistency.

Colouring Tips

If you are making a large batch of dough for all one colour then mix in your food colouring at the cooking stage. This will ensure the colour is evenly distributed. However if you want to divide the batch into several colours then wait until the kneading stage. Divide the dough into the required number of portions and add your colouring to each portion and then knead. Obviously it will take quite a bit of effort to work the colours evenly through the dough when doing it this way.

Which Play Dough Recipe is Best?

Assuming you are using a home made play dough recipe rather than shop-bought play dough, there are a bewildering array of recipes out there to try. Many of them require cooking which obviously means that adult supervision is needed but there are some no cook play dough recipes out there too.

You also need to consider reusability. If you are planning on using the play dough for a short time and then packing it away into containers for further use you need to be sure that you use a play dough recipe that is long lasting and stays soft. On the other hand if you wish to use it to make small jewelry type items that harden, you need a different kind of recipe.

Over the next few entries I'll gather together various play dough recipes and take a look at their properties but really, to get the most of them you need to just try them out and see what works best for your kids.

Once we've got ourselves a basic home made play dough recipe that we can work with, that's when the fun really begins! What can we make with it? Creative Playdough Ideas for Kids gives you 32 pages of ideas for things to create. Check out the lady bird in the side bar for an example.